If you can upholster a chair, you can upholster a sofa or love seat which are just larger chairs.
If you want free expert advice, post your questions into our upholstery Forum
Remember a sofa is just a long chair with a few differences. Learn to cut around frames, lay in pleats, blind tack, layout fabric, use nail tack strips and ply-grip, and more furniture reupholstery tricks.
Please read notes on safety before starting your upholstery project. Also review basic cutting and sewing and basic upholstery segments. Consider purchasing some upholstery training DVDs for more detailed information, especially if you're doing this for a living.
You need the info on this page even if your job doesn't look like exactly like this chair! Furniture is like people-more alike than different.
Determine what type of project
There are many different styles of furniture so we'll try to give you the information you need to figure out the upholstery job you're working on. We go into spring retying and sofas and chairs with loose cushions in other segment on the HowTo page. We won't strip this chair down to the frame and in fact most pieces don't need to be. Often a spring and webbing job will last more than one or two recoverings. If you are doing upholstery professionally, remember that you need to get paid for your work. Most clients want a firm price and an order written up in advance so you need to be clear about what needs to be done. Generally, you can tell if springs need to be retied by simply running your hand over the seat and pushing down on the front of the seat (especially on a loose cushion piece). If the springs are really uneven or the seat is mushy they may need to be retied. Many pieces don't have coil springs at all and may only need extra padding if you can feel the springs.Things you will need...... Click an image below:
List what needs to be cut.
The first step in re-upholstering the above chair or similar sofa, or loveseat would be to list the parts that need to be cut. In this case: seat (S), inside back (IB), inside arms (IA), front band (FB), outside arms (OA), outside back (OB), front arm panels (P), and welt cord fabric. Other jobs might have loose cushions and therefore the deck and seat are under the cushions. (See links for decks and welted cushions) Also, they might have skirts (SK), front arms (FA), top arms (TA), top band (TB), etc. When you cut you'll want to mark the pieces on the back along with a "T" for top or "F" for front.
Measure the fabric carefully
See how wide the fabric is that you'll be working with, usually about 54" for upholstery weight material. Sometimes you'll want to leave the selvage edge on, if it doesn't bind up the material, to get better cuts (i.e. make the fabric go further). Next measure the chair for the outside pieces, up and down measurement first (or in the case of the seat front to back). Be careful to measure from the widest points. We won't be using any patterns on this chair. Remember the last guy that recovered the job trimmed off the excess material so leave enough to get a good grip. Remember if you are learning how to reupholster a couch and some loveseats that the inside back will be wider than 54" and you may need a fabric you can run up the roll or you may need to piece the back with a welt in between.Things you will need...... Click an image below:

Save fabric by using "stretchers".
Strip off the bottom cloth (cambric) and outside back and outside arms from the bottom up. You may want to use the padding again. Loosen the inside arm and back material where it comes through the frame. Measure for inside pieces. We often use "stretcher", that is, a scrap material sewn to the bottom or back of the fabric pieces in order to get a better cut. For example if you need 30" for an inside arm but at least 3" won't show you can add stretcher and be able to split both arms out of a 54" width of material. You can see that this saves a considerable amount of fabric waste on some jobs. For a tight seat chair like this one you must make sure the stretcher won't show when someone sits in it.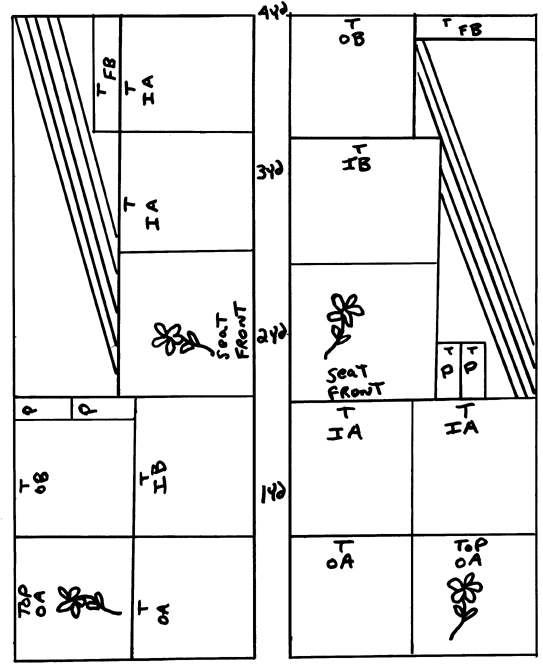
Make final fabric assessments before cutting.
It's a good idea to draw out a cutting plan or at least use a calculator to determine that there's enough fabric or if you need to adjust your measurements. This chair took 4 yds., the same chair with a loose cushion would take about 5 yds. Most chairs take between 5 and 6 yards. See the yardage chart on the How To page.FABRIC LAYOUTS
RAILROADED FABRIC on left---TRADITIONAL LAYOUT on right
The difference between these two layouts is in how the pattern was woven or printed on the material. Note the flower in the example. The diagonal lines are the welt material.
Remove excess, apply bonded polyester, and tack down.
Next strip the inside material off. The inside back padding on this chair easily came out so we removed it but on most jobs it's more time consuming to remove and reinstall so we leave it on. Different states have different laws about removing old fabric and filling, so, if you're in the trade you need to check.
We put a new layer of bonded polyester on the seat and arms. You can staple it down then pull part of it through so the staple is inside the polyester and doesn't leave an indent. You can also use a layer or half layer of cotton batting. We like to use 50/50 cotton which splits easily. Cotton is cheaper than polyester but not quite as easy to use, make sure the edges are smoothe and not too thick by peeling some off with your thumb and side of your hand. When you reupholster a couch you'll want to have plenty of padding and the new upholstery material needs to be put on nice and tight so it won't wrinkle later.
Look again at the seat on this chair (top photo). Notch the center of the seat fabric and mark the center of the front of the seat and the back of the seat. It's a good idea to set up your work. Temporarily "base tack" the fabric by putting a few large tacks part way in along the front of the seat. you'll pull the fabric tight later.
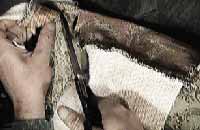
Beginning cutting and benefits of the v-cut.
Now it's time to make our first cuts around the frame. You'll use this same reupholstery technique on most furniture (chairs, couches, loveseats, sofas.)This photo is at the back of the chair where the frame separates the inside arm and back. See also above frame photo. The white fabric is our stretcher material. Here Mike is making a "V" cut which allows the material to go around the frame and tacked or stapled in the rear of the chair. If these cuts are made too deep it may leave a visible hole when someone sits down and if not deep enough the fabric may bind and pucker.
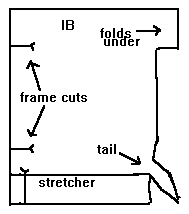
Here's a picture of where the "V" cuts are made on most upholstered furniture. This is an inside back. The tail covers the frame and tacks to the board (rail) of the arm. The stretcher is optional but can save quite a bit of fabric especially on a sofa.
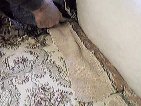
Cover the raw edges
The piece of fabric on the front of the seat next to the arm is folded under. There should be no visible raw edges. Pull the rest of the seat tight and straight and finish tacking. We use the terms tacking and stapling interchangeably but we actually mostly use air staplers not tacks these days or heavy duty fine wire electric staple guns.
View from outside. The piece of fabric on the front of the seat next to the arm is folded under. There should be no visible raw edges. Pull the rest of the seat tight and straight and finish tacking. We use the terms tacking and stapling interchangeably but we actually mostly use air staplers these days
Things you will need...... Click an image below:

Base tack the inside arms
You can base tack the inside arm in the same manner as the seat. This photo show cuts being made at the front of the seat. The inside arm fabric at the front will be turned under but we won't tack it down yet because the front band goes underneath. Now is the time to permanently tack the top of the inside arm. Next, make similar cuts in the back of the inside arm and pull through the rear of the chair frame.
Reinforce the material
Here Mike has pulled the inside arm upholstery material through the frame and is tacking it down then he will tack the back pieces. The fabric should be very taunt. If the material goes on too easily then it's likely to wrinkle especially on seats and backs the first time someone sits down.NEXT PAGE OF CHAIR INSTRUCTION
Outfit yourself with the right tools.
See the hand tools pro upholsterers use. Or buy at our upholstery tool kits page.Supplement your professional tools with these items which you may already have or can get at a hardware store: wire cutters for pulling out staples (an old dull pair is good because it won't cut the staples), a framer's square for getting straight cuts on fabric, a 45" or 60" ruler (most upholstery weight fabric is US is 54" wide) and a utility knife for stripping off old fabric.
Air guns or electric guns
This video can help you decide whether to buy air or electric, 3/8 or 1/2" crown.Buy air guns here: UPHOLSTERY STAPLER
Buy electric guns here: PRO ELECTRIC UPHOLSTERY STAPLER Electric guns from hardware stores shoot too thick of a staple and aren't powerful enough for furniture hardwoods.
Toledo Industrial Sewing Machines is a Consew dealer. We sell and service new and used industrial brands of walking foot (including portables), zig-zag and straight stitch machines, including: Adler, Chandler, Consew, Cowboy, Juki and Pfaff. Long arm and double needle models in stock.
Call us toll free, at: 866-362-7397
We stock and sell replacement parts, accessories and attachments for all industrial sewing machines, including needles, bobbins, winders, nylon thread, oil, thread lube, belts, motors, speed reducers, edge binders and folders, edge guides, presser feet, thread snips and commercial scissors.
Our website: http://www.tolindsewmach.com/


