Part 1
Before beginning your spring tying, you must first apply webbing to your frame. There are two basic types of webbing; synthetic and jute. Because of cost effectiveness, synthetic webbing is being used more and more. When doing antiques or high-quality furniture I use jute-type of webbing because it goes with the period of the furniture, and those frames are designed to use heavier webbing.
The two types of jute webbing are BFM, which has a black stripe and is used for the backs, and LMC, which has a red stripe and is used for seats. The LMC is drawn tighter and won't sag as easily as BFM. Jute webbing is usually 3 1/2 inches wide and 72 yards per roll. Synthetic webbing comes 3 1/2 inches wide and anywhere from 100 to 250 yards per roll. They don't look much different in size because the synthetic is so much thinner. Because of the thinness, synthetic works very well to give shape to outside arms and backs, and I feel it is the best to use.
Webbing placement on the frame is an important factor in starting the proper spring system. The idea is to put more webbing where stress is going to be on the seat. Web in a straight line from front to back. Why not from back to front? One, it's much easier to do things the same way each time and, two, chairs often have trim or show wood on the front edge of the frame, which makes it difficult to use a webbing stretcher.
It is best to start from the center and work out, so measure and mark the center of the back rail. To determine how many strips of webbing will run from front to back, see how many you can fit between the back legs. If it's an even number, the first strip will be places 1/4 inch from the center line. If it's an odd number, the first strip will be placed with its center over the frame's center. After the first strip is in place, place the rest with 1/4 inch between them until there is no more room for a full strip. Any space on the sides will be under the arm area and doesn't need the webbing support.
Webbing from side to side is easier. Start the first strip 1/4 inch back from the front leg, then add the rest 1/4 inch apart until there is no more room for a full strip. Any space left at the back will be under the inside back and, again, doesn't need the webbing support.
Some helpful hints: When webbing with jute, be sure to stay at least 1/4 inch back from the outside edge of the wood rail. This will make sure you can't see the webbing when the fabric is put on the frame. Also, when starting the webbing, fold the strip back and pound the folded edge flat with your tack hammer so it will fasten to the frame easier.
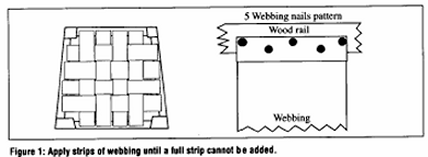
Some helpful hints: When webbing with jute, be sure to stay at least 1/4 inch back from the outside edge of the wood rail. This will make sure you can't see the webbing when the fabric is put on the frame. Also, when starting the webbing, fold the strip back and pound the folded edge flat with your tack hammer so it will fasten to the frame easier.
On the first side, tack the webbing to the frame with five webbing nails. Then stretch tie webbing tightly across the frame and temporarily tack it with three no. 6 tacks. Cut the webbing about 1 inch over the edge of the frame., fold, pound down the fold, and put in the same pattern of five nails (Figure 1). Synthetic webbing can be stapled on the frame if you wish.
What is the proper size of coil spring to use? The most common coil spring is termed a medium spring, which refers to its stiffness. This is a 9-gauge spring and is meant to be used in seats. Back springs are softer, 11-gauge spring. Coils springs have an hourglass shape that gives upward and downward support.
To tell the size of a spring, turn the open ends away from you and count the rungs. If there are 7 rungs, it's a no. 7 spring.
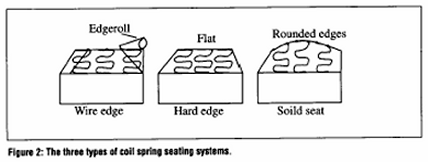
Choosing the right size depends on the system being used. The three basic systems are wire edge, hard edge and solid seat. A wire edge extends over the wood frame and is usually about 3 inches above the front rail. If you push against the front edge under the cushion, it will move up and down. A hard edge also has a cushion,but has no movement because it has only an edgeroll over the wood. The last kind is a solid seat, which does not have a seat cushion (Figure 2).
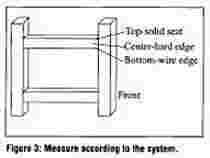
If the spring system is a wire edge, the springs should be tied off even with the bottom of the inside arm rail. If it's a solid seat, the springs should tie off at the top the inside arm rail. If it's a hard edge, the springs should be tied off in the middle of the inside arm rail. So, to select spring size, measure from the webbing to the proper spot on the inside arm rail (figure 3).
If the spot you measure to is, for example, 5 1/2 inches from the webbing, the proper size is a no. 7 spring. Why? Because, on a medium spring, the the proper height to
tie off 1 1/2 inches shorter than the spring: 5 1/2 + 1 1/2 = 7.
If unsure about the tie-off height, put the spring on the webbing and push down. You will fell a point where the spring pushes back. This is the height it should be tied off at. If tied off higher, there will not be enough resistance on the padding to keep it from settling and causing the fabric to wrinkle. If tied off lower, there will be constant pressure on the webbing and it will eventually be forced out the bottom. This is a common problem with antiques.
You usually want to use as many springs as possible in the seating area of the frame opening. If the spring system is a wire edge, the springs should go to the front end of the rail so they can extend over the wood frame to create the wire edge. Because the webbing strips are straight, they can be used to keep the springs straight. The coil spring will have one end slightly turned down. The spring should be placed with this end up so the spring will not snag the burlap. The open end should face back on each spring except the last one, where it will face the front. The springs should be fastened to the webbing in four places, either by hand tying or the use of a Klinch-it tool, which staples springs to the webbing.
Tying the springs down.
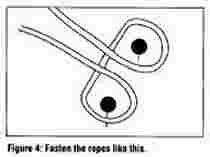
Twine length for spring tying is determined by measuring the the frame from front to back. For a wire edge, the twine length is five times the frame length. For a hard edge or solid seat, the twine length is 3 1/2 times the frame length. The types of twine most commonly used are jute and nylon. Again, I use jute with antique pieces and nylon for most other tying. On fastening the ropes to the wood I use webbing nails placed into the frame, centered on each spring row (figure 4).
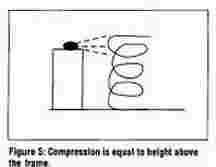
Now comes the actual tying of the twine to get the springs down to the right height. You always want to tie as low as possible on the spring, but you must stay high enough above the frame to allow up and down movement. The distance above the frame allows double that compression to the springs without breaking the twine (figure 5).
For example, if the rung you tie to is 1 inch above the wood rail, the spring can be compressed 1 inch below the top of the rail before it would run out of twine and break. It's a good idea to round off all inside top edges of the wood rail with a file or even pound them down with your tack hammer to help prevent the edge from cutting the twine as it moves.
