Part 2
Last issue covered application of the webbing and attaching springs. This month addresses the complicated process of actual tying the springs for the
hard-edge, wire-edge and solid-seat systems.
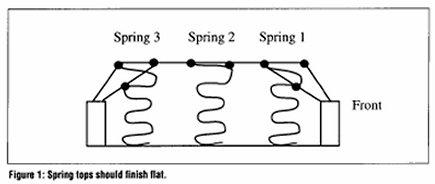
I'll begin with instruction on tying a hard-edge system. When actually tying the springs down, the idea is to tip them toward the back rail and put a loop on the lowest rung that still gives you an angle to the rung above the frame's edge. This is usually the second or third rung from the top. Start with spring 3, the one nearest the chair back. (See figure 1.) The loop needs to go over the top and around the rung. Then make the following loops:
- Front top rung of spring 3.
- back top rung of spring 2.
- Front top rung of spring 2. Remember to tip this spring back also.
- Back top rung of spring 1. Again, tipping it back as you do this.
- Front second or third rung of spring 1.
Center Nails for Twine
Secure two nails to the front rail so they are in the center of the row of springs. Take the twine and, pulling forward, strech it until the spring goes down to the proper height. Loop the twine around the nails and then drive the nails down so they are tight against the twine and the frame.
For correct measurement of the spring height, you need to put a yardstick or string across the top of the two side rails. If you measure from the webbing to the top of the springs, the spring system will bow slightly just like the webbing bottom.
Now that the springs are pulled to the proper height, you need to pull the springs so the top rung is directly above the bottom rung and the springs are vertically straight. Start from the back and work forward, making each spring straight before going on to the next one. Sometimes you will need to go to the lower part of the spring where the second or third rung was looped to pull the spring straight.
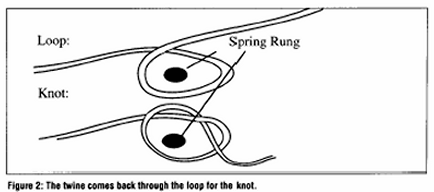
After all the springs are straight, you are ready for the second tie. This tie will use knots instead of loops. The knot is the same as the loop, except you go back through the loop before going forward (figure 2). Include the loops from the first tie in all the knots made. Make the following knots:
- Back top rung of spring 3.
- Front top rung of spring 3.
- Back top rung of spring 2.
- Front top rung of spring 2.
- Back top rung of spring 1.
- Front top rung of spring 1.
Then put two nails on the frame, pull the twine tightly to the nails and pound the nails all the way down. The spring tops should all be flat as shown in figure 1.
Continue tying the other rows of springs the same as the first row, from back to front. Notice I sais back to front, not front to back. If the springs were tightened from front to back, the knots would just slide on the springs. By tying from back to front, the knots actually tighten with use.
Cross Ties
When doing the cross ties (side-to-side), the process is the same as from back to front, except loops are not used because springs are at the proper height and cross ties are to keep the springs from moving sideways. The length of the twine for cross tying is 3 1/2 times the length of the frame direction you are tying. When setting the spring straight, you should pull the spring straight up and down, then pull about 1/4 inch more from the direction you are tying. That way when you are through tying and ready to pull the twine to the nails for securing to the frame, you can get that extra tightness when you pull the springs perfectly vertical. When doing diagonal ties, the process is the same as cross ties, and uses the same twine length.
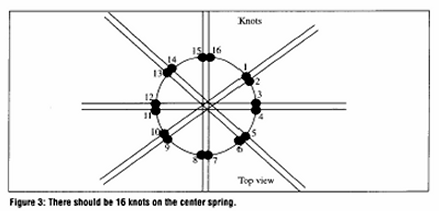
If you go to the center spring, you will find 16 knots. This has been tied in eight places with two knots in each place (figure 3). This is termed an eight-way tie or 16-knot spring system.
Tying for a Solid Seat
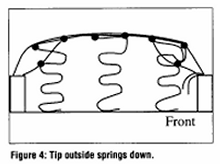
Spring tying for this system is done exactly the same as for the hard-edge system. The only difference is the outside springs are tipped down slightly to create a rounded shape. Remember, the solid seat doesn't have a loose cushion so the springs need to create the desired shape (figure 4). Placement of ties and twine lengths are the same as with the hard-edge system. The first tie uses loops and the spring is tipped back to get the correct height.
Tying for a Wire Edge
This is the most complicated system to tie and involves the most practice and time. Before starting this system, you need to "break" the front spring (spring 1). This is done to create a harder edge to the spring system. To do this, you hold spring 1 firmly and pull the top rung backward and up to stretch it. Then do the same with the second rung of spring 1. This will make the front edge very firm after tying.
The loop process is the same as previously, the rungs looped to are different:
- Third rung of spring 3.
- Front top rung of spring 3.
- Back top rung of spring 2.
- Front second rung of spring 2.
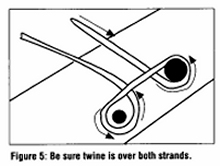
Finally, go over the back second rung of spring 1 to the front third or fourth rung of spring 1, and loop. Take the twine to the frame and nail in place. Only the first nail is looped regularly. With the second nail, you need to create a loop so when the nail is driven down, the twine coming from the nail will have the twine over it (figure 5).
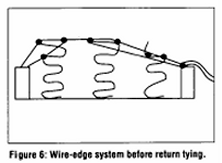
Straighten the springs as with the other systems. The difference is the first spring must extend over the wood rail so the front of the first spring will be flush with the front of the wood rail (figure 6).
The second tie is done with knots in this order, all knots including the loops:
- Back top rung of spring 3
- Front top rung of spring 3
- Back top rung of spring 2
- Front top rung of spring 2
- Back second rung of spring 1 where twine is not looped. This is because spring 1 needs to slide much more than the other springs so it can extend over the front rail. The knot includes the unlooped twine.
- Front fourth rung of spring 1.
Then pull to the frame and loop around the nails as described with the first tie. At this time the other rows of springs should be tied to the same place before finishing the second part of tying down the front of the spring system, called return tying. The first part of the completed spring system without the return tying is shown in figure 6.
For the return tying, take one of the ends from the first and second tying and go to the front top rung of spring 1. Pull this down and set the knot when the front edge is the same height as the back springs are.
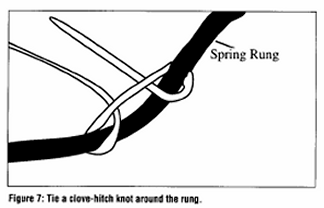
Tie a knot at the back top rung of spring 1. At the front top rung of spring 2, tie a clove hitch knot (figure 7). The clove hitch is used to change directions. When tying the clove hitch, you can regulate the position on the front of spring 1 so it is straight above the front frame rail.
Then tie a regular knot at the back top rung of spring 1 and a regular knot at the front fourth rung of spring 1. This knot will make the back of spring 1 go flat like the other springs tied off so far. Then secure to the frame with a webbing nail.
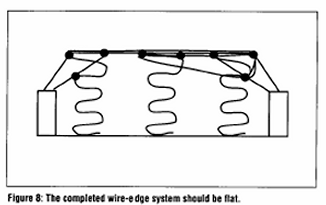
Start the second tie of the return tie by tying a knot at the top of spring 1 so the front top rung is even with the height of the other springs. (Always include previous knots.) Next, go to the back top rung of spring 1 and tie a regular knot. Go to the top tung of spring 2 and tie a clove hitch, then to the back top rung of spring 1 and tie a regular knot. Next, go to the fourth rung of spring 1 and knot off (figure 8).
Half-hitch Provides Support.
Some people like to take the twine to the frame and nail it down. I like to use a half-hitch knot and go around all the twine pieces going to the frame. I usually make about five of these half-hitches. I like to do this because there is a lot of stress with the front ties and twines, and this gives more support, helping eliminate future problems.
At this point I like to add my edgewire and secure it to the springs' top rungs. This allows me some flexibility in slightly adjusting the springs to get a good fit on the edgewire. To secure the edgewire, you can either tie it on or use edgewire clips. Three- or five-prong clips are available.
The next steps are exactly the same as with the other systems, except you need to include the edgewire in the tying. Twine for cross ties and diagonal ties is 3 1/2 times frame direction to be tied. I put torsion springs in the corner of my wire-edge spring systems to make them firmer and less likely to sway to one side over time. I do this before I do my diagonal ties. Torsion springs are fastened to the frame with no-sag clips and nails, and fastened to the edgewire by either ties or edgewire clips.
As I said, the wire-edge is the most difficult system to do and involves a lot of practice. The choice of spring rungs given is the most common. In a future article I will deal with no-sag springs.
