From The Big Book of Boat Canvas by Karen S. Lipe
Used by permission of publishers International Marine/McGraw-Hill, ISBN 0-915160-36-8(Editor's note: Please keep in mind that the drawings are clearer in the book and more basic instruction comes before the excerpt below)
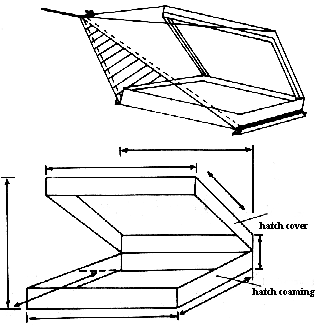
A hatch dodger is a canvas cover for a forward or main deck hinged hatch that uses the hatch cover as a supporting frame. The dodger can be used whether the hatch is all the way open or nearly shut. Its purpose is to keep rain out of the hatch when the boat is at anchor, docked or under way. In fact it should work in most sea conditions, allowing for ventilation even though spray is washing over the deck. The dodger can be used on sailboats or powerboats. It is especially useful if you are away from the boat and don't want to close it up tight while you're gone.
A proper hatch dodger should be watertight on the forward and side edges. It should be large enough to allow the hatch to be open all the way (80 degrees maximum) and should have sides that completely enclose the area between the hatch lid and the deck. The dodger should also extend far enough aft so that the rain coming from aft doesn't reach the hatch opening. If you have Plexiglass in your hatch cover, vinyl glass can be used in the top of the dodger to continue to let light shine through. You should realize, however, that the vinyl glass will need replacing before the canvas.
Material Needed:
- acrylic canvas
- vinyl glass (optional)
- 3/8in Dacron line to be sewn around three sides of the hatch
- rope track to hold the line
- number one grommets
- Dacron tape to go around three sides of the dodger
- vinyl binding

TOP: Hatch Dodger BOTTOM: Hatch cover
Construction:
- 1. Mount the rope track around the port, starboard, and forward sides of the hatch.
- 2. Fill in the measurements on the second drawing. Be sure to measure all sides of the hatch, because they may not be symmetrical. I suggest that you construct the dodger to function while the hatch cover is open to no more than 80 degrees, because you will loose your protection from the water otherwise.
- 3. Transfer all your measurements to the cloth. You will probably have three pieces of fabric to sew together.
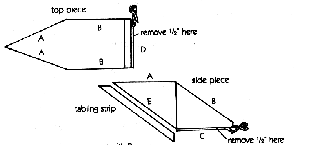
- 4. Top piece. The top piece will cover the top of the hatch and the forward edge of the hatch frame, and includes the overhang. Third drawing.
- 5. Side pieces. The side pieces will attach to the top and forward edge of the dodger.
- 6. Add a 1/2in seam allowance to edges A, B, and C.

- 7. Cut the bottom of the hatch cover (edges D and C) 1/2in shorter than the deck measurement dictates so you have room to sew the rope onto the dodger.
- 8. Cut to the exact measurement the overhang part of the top. Cut strips of tabling 2 1/2in wide to be sewn to the E edges for reinforcement and appearance.
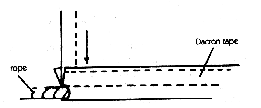
- 9. Sew the Dacron line into the 3in wide Dacron tape by folding the tape in half and placing the line in the center. Using a zipper foot, sew as close to the line as possible.

- 10. Stitch the top to the sides at edges A and B, with right sides together.
- 11. Staple the tabling strips to the E edges. Stitch the raw edges together. Fold under 1/2in of the free edge of the tabling and stitch it down.

- 12. Stitch the Dacron-bound line to the bottom edge where the dodger meets the deck (edges D and C). Sandwich the acrylic between the two layers of Dacron and stitch close to the edge of the Dacron and again close to the edge of the acrylic.
- 13. Stitch vinyl binding to edges E.
- 14. Set a grommet in the point of the overhang.
- 15. Slide the hatch cover in place. Tie off the overhang with a piece of line that ties to the grommet and the mast or any other suitable item on deck.
FURTHER PAGES ABOUT BOAT AND CANVAS WORK
Jim Grant's book THE COMPLETE CANVASWORKER'S GUIDE
MAKE BULL-NOSED (waterfall) CUSHIONS from Don Casey's book CANVASWORK & SAIL REPAIR
