
BACKS AND PANELS. USE FLEXIBLE TACK STRIP, Continued...
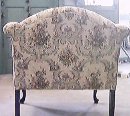
More than one method could be used to recover this back. For example, you could blind tack part of the top of the chair, plygrip or handsew the curved part, and use nail strips on the straight sides or even handsew the whole thing. Study the information on the previous page for installing outside arms. (Remember, if you are working on a square back chair all you need do is blind tack the top and nail strip the sides.)
We've decided to plygrip this back on all 3 sides. Welt cord has already been tacked along the edge of the frame to give the job a more finished look.
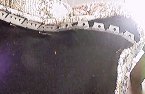
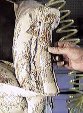
Catch the hole in the plygrip with a staple or small tack. It may be necessary to snip a few of the segments to help the plygrip make this radical curve at the top of the sides. Bend all the segments in about half way. Pad the back with cotton or bonded polyester so as to cover the plygrip.
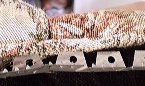
Since we're using plygrip we'll tack this back from the bottom up. Center the back material and tack along the bottom to within a couple of inches of the legs. Next, tuck the fabric in the plygrip so that the teeth catch it. Start from the center of the top and work around. You can push the fabric in with a regulator, ice pick, or small screw driver. Close the plygrip part way with your fingers then with a mallet. You're now finished with the outside back.
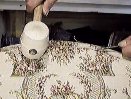
If the job you're working on has panels (like this one in the front of the arm) you should determine how they are to be attached to the arm beforeyou cover them. We usually use 1/4" staples to cover panels. Start from the middle and work up and down if the panel is curved. Place the panel upside down over some secure object to maintain the curve while covering. Clip the material where necessary to make it easier to work. There are several methods to install panels depending on the type of weave the fabric has. We are using a tapestry on this job so we will use brads or finishing nails with small heads. Drive the nail in to where it barely indents the fabric then use a regulator or other needle right next to the nail to pop the head under the fabric. Gently drive the nail the rest of the way. The fabric should close up not leaving a hole. If you are using a polished cotton or vinyl material either use the nails that are already in the panel (if they are stable) or you can put in large head nails (like roofing nails) before adding padding. After covering, install with a mallet.