Learn to disassemble, repair, reglue, use clamps
and reassemble furniture frames.
From Furniture Finishing., used by permission of Sunset Books Inc.
This is a limited text version of this refinishing book excerpt.
Due to scanning and computer monitor differences the illustrations included
here
are much clearer in the book.
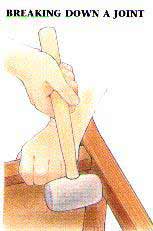
Disassemble your furniture as required before making repairs. Carefully remove all screws and knock glued sections apart with a rubber or rawhide mallet. Joints fastened with animal-hide glue can be loosened with a little alcohol; you can reach stubborn spots with a hypodermic-like glue injector (available at hardware and craft stores). Hot water and vinegar may loosen white or yellow glues. Try acetone or lacquer thinner on other glues (but be careful: these substances can dissolve an existing finish).
You may encounter buried nails used in past repairs. If so, carefully dig out the heads, then pull them with a pair of pliers or a cat's claw. Follow an orderly sequence as you work, noting how assemblies and subassemblies fit together.
Any old glue that remains in a joint may inhibit the bonding of the new glue, so you should lightly clean away all old glue from the individual pieces. Hide glue is easy to remove with water. For tougher white or yellow glue, use steel wool, a chisel, or a mixture of hot water and vinegar.
If an old joint is loose but you can't get it apart without damage to the surrounding wood, squirt a little hide glue behind the joint where it will do the most good. This method is frequently used with white or yellow glue. But these glues won't stick to old or dirty glue or wood.
Even gluing can't do the job if the joint isn't a good press-fit to begin with. It may be necessary to shape and glue extra wood to one or more parts. (See repairing a joint below)
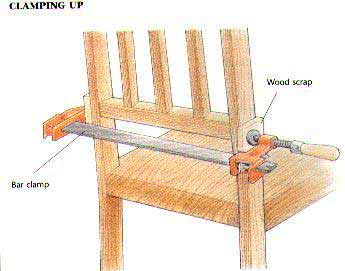
Never glue without clamping, since all newly glued joints require some form of pressure while they are drying to achieve the best possible bond. Hardware stores carry several kinds of woodworking clamps that are handy to use. Bar and pipe clamps are best for bridging long distances; C-clamps and spring clamps are good for small jobs. These items are often expensive, though, and the creative home refinisher may find many common household objects work just as well.
Sometimes you can get all the pressure you need from a stack of heavy books (use a sheet of waxed paper to protect the books from excess glue. Or you might try a few loops of clothesline or cut-up inner tubes, wrapped around the furniture and twisted tight with a stick. With a little imagination, you can devise any number of pressure producing devices, depending on the particular clamping problem at hand.
Before tightening the clamps fully, check the assembly's alignment. Now's the time to make any adjustments: loosen the clamps slightly; retighten; and recheck.
When everything's perfectly aligned, tighten the clamps until they're snug but not too tight; if you see a thin bead of glue along the joint, it means you have the right pressure.
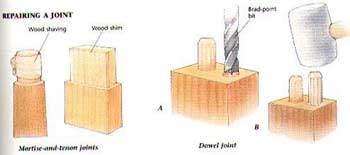
Rebuild damaged joints before assembly. Loose mortise-and-tenon joints (left) are easy to fix; thicken them with wood shavings or shims. Broken dowel joints (right) are trickier: drill out old dowel (A), then tap new glue-covered dowel into place (B).
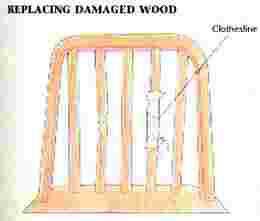
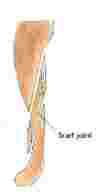
If wood is shattered or missing, cut out the section and glue on a piece with similar color and grain. Maximize gluing surfaces with steeply angled scarf joints; secure with waxed paper and clothes line.
